
| 일 | 월 | 화 | 수 | 목 | 금 | 토 |
|---|---|---|---|---|---|---|
| 1 | 2 | 3 | ||||
| 4 | 5 | 6 | 7 | 8 | 9 | 10 |
| 11 | 12 | 13 | 14 | 15 | 16 | 17 |
| 18 | 19 | 20 | 21 | 22 | 23 | 24 |
| 25 | 26 | 27 | 28 | 29 | 30 | 31 |
- 혼공자스
- 혼자공부하는자바스크립트
- 폴로스타일니트
- 스코프 및 화살표 함수
- 스파르타코딩클럽
- 봄날스웨터
- 아이디어 #앱아이디어 #건축 #현장관리어플
- 자바스크립트
- 배열의 요소로 함수 할당
- 책리뷰
- 배열
- 자바뽀개기
- 숫자자료형
- 비쥬얼 스튜디오 코드 프로그램 단축키(윈도우)
- 2023나만의버킷리스트만들기
- 자바
- BomNalSweater
- 조건문
- 불자료형
- 나머지 매개변수
- 탬플릿문자열
- 객체
- 문자자료형
- 일급객체(함수)
- 랑과나의사막
- 함수
- 유령의마음으로
- Visual Studio Code Shortcut for windows
- 항해99사전강의
- 항해99
- Today
- Total
하고 싶은게 많음
[혼공자스]09.클래스 본문

객체 지향 프로그래밍 언어는 클래스라는 문법으로 객체를 효율적이고 안전하게 만들어 객체 지향 패러다임을 쉽게 프로그래밍에 적요할 수 있도록 도와줌.
추상화 " 프로그램에 필요한 요소만 사용해서 객체를 표현하는 것. "
<script>
   //클래스 활용의 기본 양식
   class Student {
      //생성자 -> 클래스로 객체를 새엇할 때 호출되는 녀석
      constructor (이름, 국어, 영어, 수학, 과학) {
      //속성을 만드는 부분
      this.이름 = 이름
      this.국어 = 국어
      this.과학 = 과학
      this.수학 = 수학
      this.영어 = 영어
      }

      //메서드를 만드는 부분
      getSum () {
         return this.국어 + this.과학 + this.수학 + this.영어
      }
      getAverage () {
         return this.getSum / 4
      }
   }
</script>
같은 형태의 객체 만들기
//객체와 배열 조합하기
<!DOCTYPE html>
<html>
<head>
   <title></title>
   <script>
      //객체를 선언
      const students = []
      students.push ({ 이름: '구름', 국어: 87, 영어: 98, 수학: 88, 과학: 90})
      students.push ({ 이름: '별이', 국어: 92, 영어: 98, 수학: 96, 과학: 88})
      students.push ({ 이름: '겨울', 국어: 76, 영어: 96, 수학: 94, 과학: 86})
      students.push ({ 이름: '바다', 국어: 98, 영어: 52, 수학: 98, 과학: 92})

      //출력
      alert(JSON.stringify(students, null, 2))
   </script>
</head>
<body>

</body>
</html>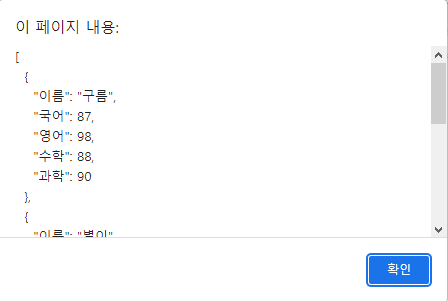
위의 코드에 각각의 객체에 학생들의 성적 총합과 평균을 구하는 기능을 추가해보자.
//객체 활용하기
<!DOCTYPE html>
<html>
<head>
   <title></title>
   <script>
      //객체를 선언
      const students = []
      students.push ({ 이름: '구름', 국어: 87, 영어: 98, 수학: 88, 과학: 90})
      students.push ({ 이름: '별이', 국어: 92, 영어: 98, 수학: 96, 과학: 88})
      students.push ({ 이름: '겨울', 국어: 76, 영어: 96, 수학: 94, 과학: 86})
      students.push ({ 이름: '바다', 국어: 98, 영어: 52, 수학: 98, 과학: 92})

      //출력
      let output = '이름\t총점\t평균\n'
      for (const s of students) {
         const sum = s.국어 + s.영어 + s.수학 + s.과학
         const average = sum / 4
         output += `${s.이름}\t${sum}점\t${average}점\n`
      }
      console.log(output)
    </script>
</head>
<body>

</body>
</html>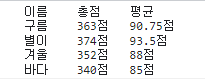
객체를 처리하는 함수
//객체를 처리하는 함수(1)
<!DOCTYPE html>
<html>
<head>
<title></title>
<script>
// 객체 선언
const students = []
students.push({이름: '구름', 국어: 87, 영어: 98, 수학: 88, 과학: 90})
students.push({이름: '별이', 국어: 92, 영어: 98, 수학: 96, 과학: 88})
students.push({이름: '겨울', 국어: 76, 영어: 96, 수학: 94, 과학: 86})
students.push({이름: '바다', 국어: 98, 영어: 52, 수학: 98, 과학: 92})
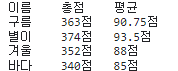
//객체를 처리하는 함수를 선언
function getSumOf (student) {
return student.국어 + student.영어 + student.수학 + student.과학
}
function getAverageOf (student) {
return getSumOf(student) / 4
} //위에서 부터 여기까지 객체의 속성과 기능을 만드는 부분
//출력
let output = '이름\t총점\t평균\n'
for (const s of students) {
output += `${s.이름}\t${getSumOf(s)}점\t${getAverageOf(s)}점\n`
}
console.log(output) //기능 만드는 부분 아래에서 여기까지 객체를 활용하는 부분
</script>
</head>
<body>
</body>
</html>
전체적인 코드는 길어졌지만 객체를 만드는 부분과 객체를 활용하는 부분으로 나누었는데 이렇게 코드를 분할하면 현재 시점에는 쓸데없이 코드가 길어졌다고 생각할 수 있지만 객체에 더 많은 기능을 추가하게 되었을 때 객체를 쉽게 유지보수할 수 있음. 객체를 활용할 때도 더 간단하게 코드를 작성할 수 있음.
객체의 기능을 메소드로 추가하기
추후 객체의 수가 늘어나면 함수 이름 충돌이 발생할 수 있음. 또한 매개변수에 어떤 종류의 객체를 넣을지 몰라 함수를 사용하는 데 혼동이 있을 수 있음. 이러한 문제를 해결하기 위해 함수 이름을 getAverageOfStudent( )처럼 의미를 알 수 있도록 길게 작성할 수 있으나 코드의 가독성이 떨어지는 문제가 발생할 수 있음.
그래서 개발자들은 함수를 메소드로써 객체 내부에 넣어서 활용하는 방법을 사용함.
//객체를 처리하는 함수(2)
<!DOCTYPE html>
<html>
<head>
  <title></title>
  <script>
    // 객체 선언
    const students = []
    students.push({이름: '구름', 국어: 87, 영어: 98, 수학: 88, 과학: 90})
    students.push({이름: '별이', 국어: 92, 영어: 98, 수학: 96, 과학: 88})
    students.push({이름: '겨울', 국어: 76, 영어: 96, 수학: 94, 과학: 86})
    students.push({이름: '바다', 국어: 98, 영어: 52, 수학: 98, 과학: 92})

    //students 배열 내부의 객체 모두에 메소드를 추가.
    for (const student of students) {
      student.getSum = function () {
        return this.국어 + this.영어 + this.수학 + this.과학
      }

      student.getAverage = function () {
        return this.getSum() / 4
      }
    }

    //출력
    let output = '이름\t총점\t평균\n'
    for (const s of students) {
      output += `${s.이름}\t${s.getSum(s)}점\t${s.getAverage(s)}점\n`
    }
    console.log(output)
  </script>
</head>
<body>

</body>
</html>
//객체를 생성하는 함수
<!DOCTYPE html>
<html>
<head>
  <title></title>
  <script>
    function createStudent(이름, 국어, 영어, 수학, 과학) {
      return {
        //속성을 선언
        이름: 이름,
        국어: 국어,
        영어: 영어,
        수학: 수학,
        과학: 과학,
        //메소드를 선언
        getSum () {
          return this.국어 + this.영어 + this.수학 + this.과학
        },
        getAverage () {
          return this.getSum()/4
        },
        toString () {
          return `${this.이름}\t${this.getSum()}점\t${this.getAverage()}점\n`
        }
      }
    }
    //객체를 선언
    const students = []
    students.push(createStudent('구름',87,98,88,90))
    students.push(createStudent('별이',92,98,96,88))
    students.push(createStudent('겨울',76,96,94,86))
    students.push(createStudent('바다',98,52,98,92))

    //출력
    let output = '이름\t총점\t평균\n'
    for ( const s of students ) {
      output += s.toString ()
    }
    console.log(output)
  </script>
</head>
<body>

</body>
</html>
createStudent( )함수를 만들고 여기에 객체를 리턴하게 만들었음.
이렇게 함수를 만들면 여러가지 이득이 발생.
객체를 하나하나 만들 대와 비교해서 오탈자 위험 감소, 코드 입력하는 양 크게 줄음, 속성과 메소드를 한 함수 내부에서 관리할 수 있으므로 객체를 더 손쉽게 유지보수 가능
클래스 선언하기
객체 지향 프로그래밍 Object Oriented Programming 객체들을 정의하고 그러한 객체를 활용해서 프로그램을 만드는 것
클래스 Class 객채를 만들 때 수많은 지원을 하는 대신 많은 제한을 거는 문법 (현재 사용되는 대부분의 객체 지향 프로그래밍 언어는 클래스 문법을 제공_C++, C#, 자바, 루비, 코틀린, 스위프트, PGP 등 모두 클래스 기반의 객체 지향 프로그래밍 언어)
프로토타입 Prototype 제한을 많이 하지는 않지만 대신 지원도 별로 하지않은 문법 (자바스크립트 초기에는 프로토타입 문법을 제공했으나 현재 최신 자바스크립트는 클래스 문법을 제공하기 시작)
class 클래스 이름 {
}
인스턴스 instance 또는 객체object : 클래스를 기반으로 만든 객체
new 클래스 이름 ( )
클래스: 객체를 만드는 함수와 비슷 (뿡어빵 틀) 첫글자는 대문자로 지정하는 것은 개발자들의 약속.
인스턴스(객체): 객체를 만드는 함수로 만든 객체와 비슷(붕어빵)
//클래스 선언하고 인스턴스 생성
<!DOCTYPE html>
<html">
<head>
  <title></title>
  <script>
    //클래스 선언
    class Student {

    }

    //학생 선언
     const student = new Student ()

     //학생 리스트 선언
     const students = [
      new Student(),
      new Student(),
      new Student(),
      new Student()
      ]
  </script>
</head>
<body>

</body>
</html>
생성자
new Student()라는 코드를 보면 Student 뒤에 함수처럼 괄호를 열고 닫는 기호가 있음. 이는 객체가 생성될 때 호출되는 생성자라는 이름의 함수.
//생성자 함수와 속성 추가하기
<!DOCTYPE html>
<html>
<head>
   <title></title>
   <script>
      class Student {
         constructor (이름, 국어, 영어, 수학, 과학) {
            this.이름 = 이름
            this.국어 = 국어
            this.영어 = 영어
            this.수학 = 수학
            this.과학 = 과학
         }
      }

      //객체 선언
      const students = []
      students.push(new Student('구름',87,98,88,90))
      students.push(new Student('별이',92,98,96,88))
      students.push(new Student('겨울',76,96,94,86))
      students.push(new Student('바다',98,52,98,92))
   </script>
</head>
<body>

</body>
</html>
메소드
//메소드 추가하기
<!DOCTYPE html>
<html>
<head>
   <title></title>
   <script>
      class Student {
         constructor (이름, 국어, 영어, 수학, 과학) {
            this.이름 = 이름
            this.국어 = 국어
            this.영어 = 영어
            this.수학 = 수학
            this.과학 = 과학
         }

         getSum() {
            return this.국어 + this.영어 + this.수학 + this.과학
         }

         getAverage () {
            return this.getSum() / 4
         }

         toString() {
            return `${this.이름}\t${this.getSum()}점\t${this.getAverage()}점\n`
         }
      }

      //객체 선언
      const students = []
      students.push(new Student('구름',87,98,88,90))
      students.push(new Student('별이',92,98,96,88))
      students.push(new Student('겨울',76,96,94,86))
      students.push(new Student('바다',98,52,98,92))

      //출력
      let output = '이름\t총점\t평균\n'
      for (const s of students) {
         output += s.toString()
      }
      console.log(output)
   </script>
</head>
<body>

</body>
</html>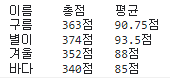
클래스의 고급 기능
클래스는 객체를 더 안전하고 효율적으로 생성하기 위해 만들어진 문법임. 어떤 위험과 비효율이 있는지 확인할 필요가있음.
상속 "어떤 클래스가 갖고있는 유산(속성과 메소드)을 다른 클래스에게 물려주는 형태"
부모 클래스 parent class : 유산을 주는 클래스
자식 클래스 child class : 유산을 받는 클래스
class 클래스 이름 extends 부모클래스 이름 {
}
//Rectangle 클래스
<!DOCTYPE html>
<html>
<head>
   <title></title>
   <script>
      class Rectangle {
         constructor (width, heigth) {
            this.width = width
            this.heigth = heigth
         }

         //사각형의 둘레를 구하는 메소드
         getPerimeter () {
            return 2 * (this.width + this.heigth)
         }

         //사각형 넓이를 구하는 메소드
         getArea() {
            return this.width * this.heigth
         }
      }

      const rectangle = new Rectangle(10, 20)
      console.log(`사각형의 둘레: ${rectangle.getPerimeter()}`)
      console.log(`사각형의 넓이: ${rectangle.getArea()}`)
   </script>
</head>
<body>

</body>
</html>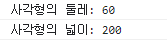
Square이름의 정사각형을 나타내는 클래스를 추가한다.
<!DOCTYPE html>
<html>
<head>
   <title></title>
   <script>
      class Rectangle {
         constructor (width, heigth) {
            this.width = width
            this.heigth = heigth
         }

         //사각형의 둘레를 구하는 메소드
         getPerimeter () {
            return 2 * (this.width + this.heigth)
         }

         //사각형 넓이를 구하는 메소드
         getArea() {
            return this.width * this.heigth
         }
      }

      //정사각형 클래스
      class Square {
         constructor (length) {
            this.length = length
         }

      //정사각형의 둘레를 구하는 메소드
      getPerimeter() {
         return 4 + this.length
      }

      //정사각형의 넓이를 구하는 메소드
      getArea() {
         return this.length * this.length
      }
   }

   //클래스 사용
      const square = new Square(10)
      console.log(`정사각형의 둘레: ${square.getPerimeter()}`)
      console.log(`정사각형의 넓이: ${square.getArea()}`)
   </script>
</head>
<body>

</body>
</html>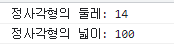
위의 코드를 상속기능을 사용하여 해보겠삼.
<!DOCTYPE html>
<html>
<head>
   <title></title>
   <script>
      class Rectangle {
         constructor (width, heigth) {
            this.width = width
            this.heigth = heigth
         }

         //사각형의 둘레를 구하는 메소드
         getPerimeter () {
            return 2 * (this.width + this.heigth)
         }

         //사각형 넓이를 구하는 메소드
         getArea() {
            return this.width * this.heigth
         }
      }

      //정사각형 클래스
      class Square extends Rectangle { //Square클래스가 자식클래스
         constructor (length) {
            super(length, length) //부모의 생성자 함수를 호출하는 코드
         }
      }

   //클래스 사용
      const square = new Square(10,20)
      console.log(`정사각형의 둘레: ${square.getPerimeter()}`)
      console.log(`정사각형의 넓이: ${square.getArea()}`)  //square에 메소드 두개를 선언하지 않았지만 상속을 받았으므로 사용가능~
   </script>
</head>
<body>

</body>
</html>
결과는 위의 코드와 결과가 동일함.
private 속성과 메소드
//사용자가 음수 길이를 입력할 경우
<!DOCTYPE html>
<html>
<head>
   <title></title>
   <script>
      //정사각형 클래스
      class Square {
         constructor (length) {
            this.length = length
         }
         getPerimeter () { return 4 * this.length }
         getArea () { return this.length * this.length }
      }

      //클래스 사용하기
      const square = new Square(-10)
      console.log(`정사각형의 둘레 : ${square.getPerimeter()}`)
      console.log(`정사각형의 넓이: ${square.getArea()}`)
   </script>
</head>
<body>

</body>
</html>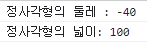
길이에 음수를 넣으면 안되지만 사용하는 사람은 그걸 모를수가 있음. 이제 조건문을 사용해서 0이하의 경우 예외를 발생시켜서 사용자에게 인지시켜줘야함.
//길이에 음수가 들어가지 않게 수정하기
<!DOCTYPE html>
<html>
<head>
   <title></title>
   <script>
      //정사각형 클래스
      class Square {
         constructor (length) {
            if (length <= 0){
               throw '길이가 0보다 커야 합니다.'  //throw키워드를 사용해서 강제로 오류 발생
            }
            this.length = length
         }
         getPerimeter () { return 4 * this.length }
         getArea () { return this.length * this.length }
      }

      //클래스 사용하기
      const square = new Square(-10)
      console.log(`정사각형의 둘레 : ${square.getPerimeter()}`)
      console.log(`정사각형의 넓이: ${square.getArea()}`)
   </script>
</head>
<body>

</body>
</html>
하지만 이러한 코드만으로는 다음과 같이 생성자로 객체를 생성한 이후에 사용자가 length속성을 변경하는 것을 막을 수 없음.
const square = new Square(10)
square.length = -10 //이렇게 음수를 지정해버리면 막을 수 없음
console.log(`정사각형의 둘레 : ${square.getPerimeter()}`)
console.log(`정사각형의 넓이: ${square.getArea()}`)
클래스 사용자가 클래스 속성 또는 메소드를 의도하지 않은 방향으로 사용하는 것을 막아 클래스의 안정성을 확보하기 위해 나온 문법이 private 속성과 메소드임.
class 클래스 이름 {
#속성 이름
#메소드 이름 () {
}
}
속성과 메소드 이름 앞에 #을 붙이기만 하면 됨. #이 붙어있는 속성과 메소드는 모두 private 속성과 메소드가 됨. 주의점은 private속성은 사용하기 전에 미리 외부에 어떤 속성을 private 속성으로 사용하겠다고 선언해줘야함.
//private 속성 사용하기(1)
<!DOCTYPE html>
<html>
<head>
   <title></title>
   <script>
      //사각형 클래스
      class Square {
         #length  //이 위치에 해당 속성을 private속성으로 사용하겠다고 미리 선언해줌

         constructor (length) {
            if (length <= 0){
               throw '길이가 0보다 커야 합니다.'
            }
            this.#length = length
         }
         getPerimeter () { return 4 * this.#length }
         getArea () { return this.#length * this.#length }
      }

      //클래스 사용하기
      const square = new Square(10)
      console.log(`정사각형의 둘레 : ${square.getPerimeter()}`)
      console.log(`정사각형의 넓이: ${square.getArea()}`)
   </script>
</head>
<body>

</body>
</html>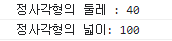
이렇게 private 속성으로 변경하면 클래스 외부에서는 해당 속성에 접근할 수 없음. square 객체의 length 속성을 변경하더라도 클래스 내부에서 사용하고 있는 속성은 #length속성이지 length속성이 아니므로 결과에는 어떠한 영향도 주지 않음
//private 속성 사용하기 (2)
<!DOCTYPE html>
<html>
<head>
   <title></title>
   <script>
      //사각형 클래스
      class Square {
         #length  //이 위치에 해당 속성을 private속성으로 사용하겠다고 미리 선언해줌

         constructor (length) {
            if (length <= 0){
               throw '길이가 0보다 커야 합니다.'
            }
            this.#length = length
         }
         getPerimeter () { return 4 * this.#length }
         getArea () { return this.#length * this.#length }
      }

      //클래스 사용하기
      const square = new Square(10)
      square.length = -10 //클래스 내부의 length 속성을 사용하여 변경해봄.
      console.log(`정사각형의 둘레 : ${square.getPerimeter()}`)
      console.log(`정사각형의 넓이: ${square.getArea()}`)
   </script>
</head>
<body>

</body>
</html>
결과는 위의 코드와 동일함.
#length속성을 사용하는 코드를 실행하면 아래와 같이 오류가 남
//private 속성 사용하기 (3)
<!DOCTYPE html>
<html>
<head>
   <title></title>
   <script>
      //사각형 클래스
      class Square {
         #length  //이 위치에 해당 속성을 private속성으로 사용하겠다고 미리 선언해줌

         constructor (length) {
            if (length <= 0){
               throw '길이가 0보다 커야 합니다.'
            }
            this.#length = length
         }
         getPerimeter () { return 4 * this.#length }
         getArea () { return this.#length * this.#length }
      }

      //클래스 사용하기
      const square = new Square(10)
      square.#length = -10  //이 부분
      console.log(`정사각형의 둘레 : ${square.getPerimeter()}`)
      console.log(`정사각형의 넓이: ${square.getArea()}`)
   </script>
</head>
<body>

</body>
</html>

이렇게 만든 private 속성은 클래스 외부에서는 접근할 수 없으므로 클래스 사용자가 클래스를 잘못 사용하는 문제를 줄일 수 있음.
게터와 세터
위와 같이 private 속성을 사용하면 #length속성에 아예 접근할 수 없는 문제가 발생하는데 현재 square 객체의 length 속성이 몇인지 확인불가에 length 속성을 변경하고 싶어도 변경이 불가능하다.
그래서 프레임워크 개발자들은 상황에 따라 속성을 읽고 쓸 수 있는 메소드를 만들어 제공함.
//게터(getter)와 세터(setter) 메소드
<!DOCTYPE html>
<html>
<head>
   <title></title>
   <script>
      //정사각형 클래스
      class Square {
         #length

         constructor (length) {
            this.setLength(length)
         }

         setLength (value) {
            if (value <= 0){
               throw '길이가 0보다 커야 합니다.'
            }
            this.#length = value
         }

         getLength (value) {
            return this.#length
         }

         getPerimeter () { return 4 * this.#length }
         getArea () { return this.#length * this.#length }
      }

      //클래스 사용하기
      const square = new Square(10)
      console.log(`한 변의 길이는 ${square.getLength()}입니다.`)

      //예외 발생시키기
      square.setLength(-10)
   </script>
</head>
<body>

</body>
</html>
위의 코드에 getLegnth( ) 메소드와 setLength( ) 메소드가 추가됐음.
게터getter : get땡땡 ( ) 메소드처럼 속성 값을 확인할 때 사용하는 메소드
세터setter : set땡땡 ( ) 메소드처럼 속성에 값을 지정할 때 사용하는 메소드
게터 세터를 계속해서 사용하니까 더 쉽게 작성 사용할 수 있도록 간략하게 만듬.
class 클래스 이름 {
get 이름 ( ) { return 값 }
set 이름 (value) { }
}
//get키워드와 set 키워드 조합하기
<!DOCTYPE html>
<html>
<head>
   <title></title>
   <script>
      //정사각형 클래스
      class Square {
         #length

         constructor (length) {
            this.length = length //this.length에 값을 지정하면 set length(length) 메소드 부분이 호출됨
         }

         get length () {
            return this.#length
         }

         get perimeter () { return 4 * this.#length }
         get area () { return this.#length * this.#length }


      set length (length){
         if (length <= 0) {
            throw '길이는 0보다 커야함.'
         }
         this.#length = length
      }
   }

      //클래스 사용하기
      const squareA = new Square(10)
      console.log(`한 변의 길이는 ${squareA.length}`)
      console.log(`둘레: ${squareA.perimeter}`)
      console.log(`넓이: ${squareA.area}`)

      //예외 발생시키기
      const squareB = new Square(-10)
   </script>
</head>
<body>

</body>
</html>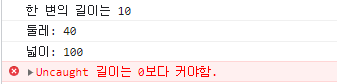
static 속성과 메소드 " 정적 속성, 정적 메소드 "
디자인패턴 design pattern " 효율적으로 프레임워크를 개발할 수 있게 고안한 다양한 패턴"
class 클래스 이름 {
static 속성 = 값
static 메소드 ( ) {
}
}
static 속성과 메소드는 인스턴스를 만들지 않고 사용할 수 있는 속성과 메소드임. 그냥 일반적인 변수와 함수처럼 사용가능.
클래스 이름.속성
클래스 이름.메소드( )
//static 키워드 사용하기
<!DOCTYPE html>
<html>
<head>
   <title></title>
   <script>
      class Square {
         #length
         static #counter = 0 //private 특성과 static 특성은 한꺼번에 적용 가능
         static get counter () {
            return Square.#counter
         }
         constructor (length) {
            this.length = length
            Square.#counter += 1
         }

         static perimeterOf (length) {
            return length * 4
         }
         static areaOf (length){
            return length * length
         }

         get length () { return this.#length }
         get perimeter () { return this.#length * 4 }
         get area () { return this.#length * this.#length }

         set length (length) {
            if (length <= 0) {
               throw '길이는 0보다 커야함요.'
            }
            this.#length = length
         }
      }

      //static 속성 사용
      const squareA = new Square(10)
      const squareB = new Square(20)
      const squareC = new Square(30)
      console.log(`지금까지 생성된 Square인스턴스는 ${Square.counter}개임당.`) //static 메소드 사용
      console.log(`한 번의 길이가 20인 정사각형의 둘레는 ${Square.perimeterOf(20)}임당.`)
      console.log(`한 변의 길이가 30인 정사각형의 넓이는 ${Square.areaOf(30)}임당.`)

   </script>
</head>
<body>

</body>
</html>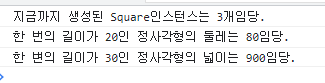
#counter라는 이름의 static 속성과 counter()라는 이름의 static메소드(게터)를 만들었음. #counter라는 속성은 Square 객체의 생성자가 호출될 때마다 1씩 증가하도록 했음. 이를 활용하면 현재까지 Square 객체가 몇 개 생성되었는지 확인 가능.
또한 perimeterOf()메소드와 areaOf()메소드를 추가했음. 이 메소드들은 Square객체를 생성하지않고도 둘레와 넓이를 간단하게 구할 수 있게 해주는 메소드임.
위의 코드를 보고 나면 외부에 변수와 함수를 선언해도 되겠다라는 생각을 할 수있으나 이렇게 변수와 함수를 클래스 내부에 작성하면 1. 어떤 속성과 함수가 클래스 내부에 귀속되어 있다는 것을 명시적으로 나타낼 수 있고, 2. private 특성과 게터, 세터를 부여해서 조금 더 안전한 변수와 함수를 사용가능.
오버라이드 override " 부모가 갖고 있는 함수를 자식에서 다시 선언해서 덮어쓰는 것 "
//메소드에서 순서대로 메소드 호출하기
<!DOCTYPE html>
<html>
<head>
   <title></title>
   <script>
      //클래스 선언
      class LifeCycle {
         call() {
            this.a()
            this.b()
            this.c()
         }

         a() {console.log('a()메소드를 호출')}
         b() {console.log('b()메소드를 호출')}
         c() {console.log('c()메소드를 호출')}
      }

      //인스턴스 생성
      new LifeCycle().call()
   </script>
</head>
<body>

</body>
</html>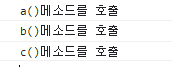
//오버라이드
<!DOCTYPE html>
<html>
<head>
   <title></title>
   <script>
      //클래스 선언
      class LifeCycle {
         call() {
            this.a()
            this.b()
            this.c()
         }

         a() {console.log('a()메소드를 호출')}
         b() {console.log('b()메소드를 호출')}
         c() {console.log('c()메소드를 호출')}
      }

      class Child extends LifeCycle {
         a() {
            console.log('자식의 a() 메소드임.') //오버라이드
         }
      }

      //인스턴스 생성
      new Child().call()
   </script>
</head>
<body>

</body>
</html>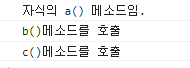
원래 a( ) 메소드에 있던 출력이 바뀌었음. call( ) 메소드에서 a( )메소드를 실행하는데, a( ) 메소드가 덮어쓰여져서 출력된 것. 만약 부모에 있던 메소드의 내용도 사용하고 싶다면 super.메소드( )형태의 코드를 사용하면 됨.
//부모에 있던 내용 가져오기
<!DOCTYPE html>
<html>
<head>
   <title></title>
   <script>
      //클래스 선언
      class LifeCycle {
         call() {
            this.a()
            this.b()
            this.c()
         }

         a() {console.log('a()메소드를 호출')}
         b() {console.log('b()메소드를 호출')}
         c() {console.log('c()메소드를 호출')}
      }

      class Child extends LifeCycle {
         a() {
            super.a()  //여기가 수정된 것.
            console.log('자식의 a() 메소드임.') //오버라이드
         }
      }

      //인스턴스 생성
      new Child().call()
   </script>
</head>
<body>

</body>
</html>
오버라이드 예
//toString()메소드 오버라이드하기
<!DOCTYPE html>
<html>
<head>
   <title></title>
   <script>
      class Pet {
         constructor (name, age) {
            this.name = name
            this.age = age
         }
         toString () {
            return `이름: ${this.name}\n 나이: ${this.age}살`
         }
      }
      const pet = new Pet('구름', 6)
      alert(pet)
      console.log(pet+'')
   </script>
</head>
<body>

</body>
</html>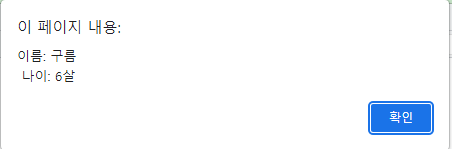
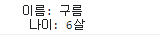
alert()함수는 매개변수로 받은 자료를 문자열로 바꾼 뒤에 출력함. toStirng() 메소드를 오버라이드했으므로 바꾼 형태로 출력되는 것을 볼 수 있음. 또한 문자열과 다른 자료형을 결합할 때도 내부적으로 다른 자료형을 문자열로 변환한 뒤 결합함. 따라서 문자열 결합 연산자를 호출할 때도 우리가 오버라이드한 toStirng( )메소드의 리턴값이 나오는 것을 확인가능.
'IT > 자바스크립트' 카테고리의 다른 글
| [혼공자스] 10. 리액트 라이브러리 맛보기 (0) | 2022.12.06 |
|---|---|
| [혼공자스] 08. 예외처리 (0) | 2022.12.05 |
| [혼공자스] 07.문서 객체 모델 (0) | 2022.12.05 |
| [혼공자스] 06. 객체 (0) | 2022.11.18 |
| 자바스크립트 실수 모음집 (0) | 2022.11.18 |


